
Homeschooling Crafts: Air Dry Clay Art With Tiles and Pressed Flowers
This post contains affiliate links. I only link to products that I have personally used and feel comfortable recommending. If you use these links, it does not increase the cost for you. It does help support this blog and my family, which allows me to bring you more helpful content. I really appreciate it when you use these links to purchase these products!
Many of you over on my instagram page saw us creating these in my stories and asked about the materials we used, so I thought I’d share here on the blog.
As a homeschooling mama, I’m always on the lookout for fun, hands-on projects to do with the kids. I’ve never used air dry clay before, but I thought ‘what the hey, I’ll try this stuff out.’
IT. WAS. SO. FUN. Y’ALL!
It is remarkably workable, and very similar to other clay I’ve worked with back when I played around with ceramics often (still a dream of mine to get back into that…). We had so much fun that I’m considering buying this BIG box of clay soon so that the kids and I can create clay models to our hearts’ content.
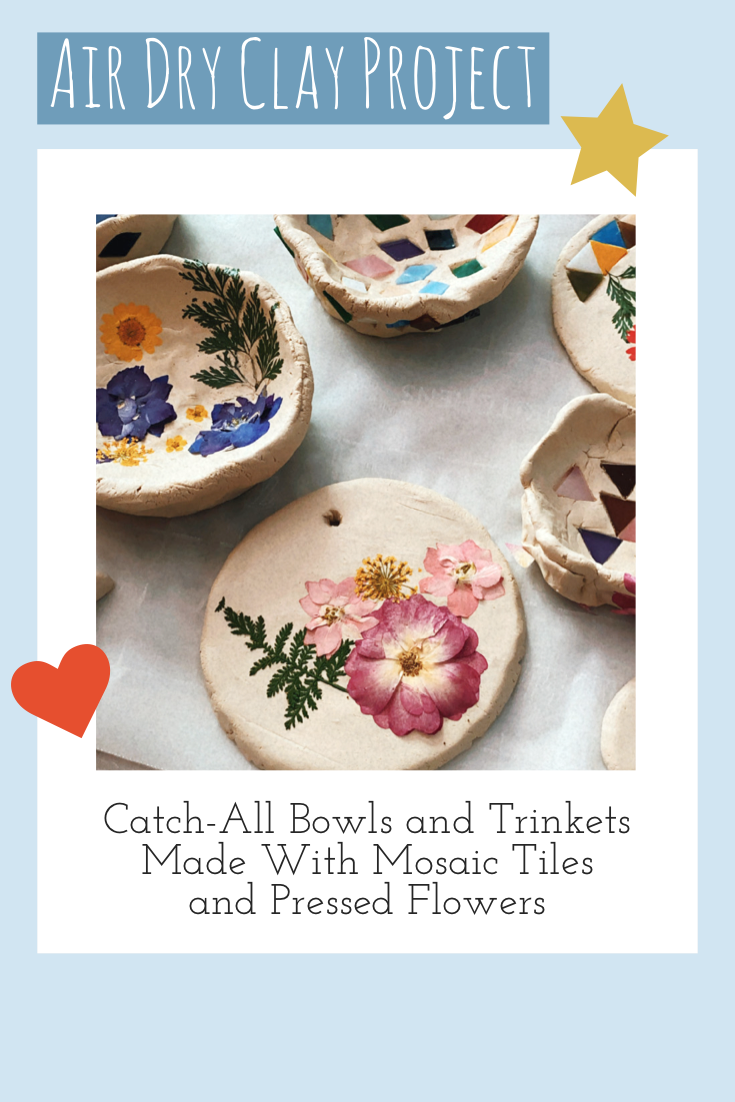
Anywho… so I started out with the idea of making some small catch-all bowls with this air-dry clay. Then my inspiration ran away with me and I decided I wanted some options for extra decor. I decided to grab some tiny mosaic tiles and pressed flowers as well. Since I wanted to be sure the add-ons were protected and I wanted a way to seal the end results, I also got some paintbrushes and Mod Podge.
Once we had all the supplies, we were ready to go! We just had to wait until Huxley was down for a nap so that he didn’t try to swallow the mosaic tiles or stick his foot into our masterpieces.

I started out by directing the kids to make little pinch pot catch all bowls. We rolled the clay into a ball about twice the size of a golf ball but still smaller than a tennis ball. Then we pressed into the center of it and pinched it around the sides until it resembled a bowl shape. Be careful to leave the sides relatively thick so that your kids don’t press right through it when adding their decorations. We had to remake a couple of our pieces because the kids shoved mosaic tiles all the way through to the other side. Also periodically unstick the project from the table, especially before starting to press flowers and tiles into it.
After we finished the bowls, my kids were still excited to keep creating, and we still had over 30 minutes left until the end of Huxley’s nap, so we went ahead and created a few more little trinkets: small plaques with holes to hang them from, a small tray, and a little fish with mosaic tile scales.
The clay says it takes 2-3 days to air dry, but of course it depends on the thickness of the clay. We plan to give it 3-4 days at least and then finish them by painting them with a couple layers of Mod Podge.
Materials Used:
Crayola Air Dry Clay (Comes in 5lb or 25lb sets)
Pressed Flowers (You could totally make these yourself too if you planned ahead in the springtime!)
Mod Podge (They also make a dishwasher safe version and an outdoor use version, and more!)
Seriously though… I’m so stoked about how this turned out that I plan to order the huge 25 lb box of this clay and some better clay working tools as well. This clay is PERFECT and really feels like the clay I am accustomed to using when using a kiln. The possibilities are endless!